osiriswrecks 1 week ago • 100%
What kind of problems do you specifically run into?

I love to reference this guide every once in a while when I'm doing interior work. It's a great reminder of how to take advantage of a space visually with simple design choices.
 www.youtube.com
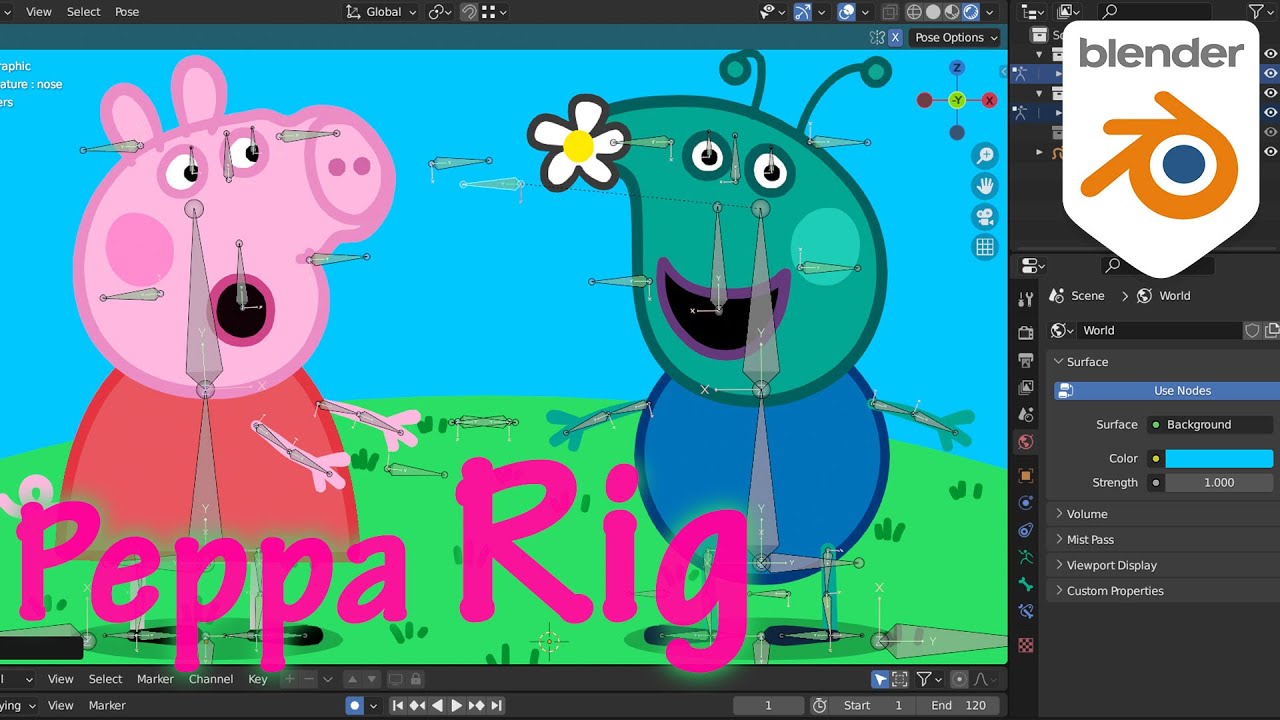
Again, not mine, but I'm going through old Reddit saves. It's fun to see unique rigs in Blender!
Not mine, but I stumbled on this today. Pretty sweet!
*I had this post saved in my Reddit account, and wanted to reshare it here now that I'm moving off the platform. It's helped me get out of a couple of pinches and hopefully it helps you, too.* Originally posted by `u/frizzil` to [r/blender](https://www.reddit.com/r/blender/comments/eu3w6m/guide_how_to_scale_a_rigify_rig/). ## Step 1: Prepare - *Backup your project!* - Figure out what value you're going to scale everything by. Every time you scale, you should hit S then immediately type in your value, for consistency. ## Step 2: Scale linked meshes and curves - Scale the vertices of all meshes and curves linked to the rig (not the objects themselves.) Note: you can scale multiple objects' contents simultaneously by selecting them all in Object mode, then swapping to Edit mode, selecting all vertices with `A`, then scaling with `S`. Be aware that you cannot edit both *curves* and *meshes* simultaneously, however. For clarity, you may optionally disable then re-enable the Armature modifier for all objects, before and after this step. (To do so, select all Armature'd objects, then go `Properties -> Modifiers Properties (Wrench) -> Armature -> Alt-LMB on 'Realtime' (the Monitor)`) ## Step 3: Scale the rig 1. Select the rig. 2. Ensure your rig is in Rest pose, for clarity’s sake. (`Pose mode -> ‘A’ to select all -> Pose -> Clear Transforms -> All`) 3. In the Properties Editor, navigate to `Object Data Properties`, then mark *all* Layers visible by holding Shift then dragging LMB over them. 4. Go into Edit mode, select all bones with `A`, then scale with `S`. 5. Check for any bones that didn’t scale. If you see one and cannot select it directly, find it in the Outliner somewhere under `your_rig -> Pose`, then scale them. (`root -> VIS_thigh_ik_pole.L/R` are likely culprits!) Don’t freak out if things look bad outside of Edit mode! That’s our next step. ## Step 4: Fixing the constraints Any unintended deformation in Pose mode, crazy or slight, shall be your guide. We’re now going to find every single Bone Constraint of type “Stretch to” and hit the “Reset” button on it. **Easy Method** Fortunately, Blender lets us accomplish this programmatically, saving us loads of time. 1. Swap to Object mode and select your rig. 2. Open the Scripting workspace. 3. Paste this *entire* code block into the Python Console, then hit `Enter` twice: ``` bone_count = 0 for b in bpy.context.active_object.pose.bones: for c in b.constraints: if c.type == "STRETCH_TO": c.rest_length = 0 bone_count += 1 ``` Explanation: all Stretch To constraints in Rigify are generated with the “default” rest length of zero... which Blender interprets as needing to be immediately recalculated based on current distance. We effectively changed that distance earlier by scaling the bones, so now we reset to zero to have Blender calculate it once again. Now, verify that the script worked by typing in `bone_count` then hitting `Enter` again, which will spit out the number of constraints we just changed. It should NOT be zero - if it is, then double check that your rig is selected and your 3D View is in Object mode, then try again. Your rig should look much better, though it may not be perfect yet. If you can't get this to change *any* bones, consider starting at step 1 of Manual Method; otherwise, skip to step 6 (*sic*, no step 6, move to step 5 instead). **Manual Method** 1. Go into Pose mode. 2. Back in `Object Data Properties`, select only the last Layer (i.e. the ‘ORG’ bone layer.) 3. Select a bone (preferably ‘ORG-spine’, somewhere in the waist), then go 1Properties -> Bone Constraints1, look for a “Stretch To” modifier, then if present, “Reset” it. Repeat for *all* bones on the layer, working your way out from the spine. 4. Now select only the third-to-last layer (i.e. the ‘DEF’ bone layer), and repeat the last step for all bones in it. 5. Check the second-to-last layer (i.e. ‘MCH’) for several bones that may also need to be “Reset”, particularly the huge bones marked ‘ik_stretch’. !< 6. *Advanced:* If you have anything custom and hook-based (like Spline IKs), now is the time to find those hook modifiers and hit their ‘Reset’ buttons while in Edit mode with those objects. 7. Verify that nothing looks off by toggling between Edit and Pose mode on your rig, and checking any bones near where deformation is present. (It’s not likely, but you may need to check the other layers.) If you have animations, double check that nothing is currently keyframed. When you’ve finished, the model should look identical in both modes. ## Step 5: Animations (if present) The location channels for many of the bones in each animation will also need to be scaled by your value, lest your animations swing too short or too wide. **Easy Method** 1. In the Python console, type in `rescale = YOUR_SCALE_VALUE` except with your scale value, and hit Enter. 2. Again in the Python console, type in `rescale_actions = ['my_action1', 'my_action2']` except with the *exact* names of all your desired actions, each inside two single-quotes, and separated by commas, between the two brackets. Then hit `Enter`. 3. Now paste in the *entire* following script, then hit `Enter` twice: ``` for action_id in rescale_actions: for fcurve in bpy.data.actions[action_id].fcurves: data_path = fcurve.data_path if data_path.startswith('pose.bones[') and data_path.endswith('].location'): for p in fcurve.keyframe_points: p.co[1] *= rescale ``` If you get an error, (e.g. you typed in an action's name incorrectly), then Undo with `Ctrl+Z` then repeat from step 2, until you get no errors and all your actions are scaled! If you just can't get this to work, or need to troubleshoot something, then you might consider the *Manual Method*... but it will be extremely tedious. **Manual Method** 1. Configure a workspace with a 3D View of your model, the Graph Editor, and the Dope Sheet. 2. In the Graph Editor, enable `View -> Only Selected Keyframes Handles`. (This will save you clicks.) 3. Select your rig and swap to Pose mode. 4. For each misplaced bone under each Action in the Dope Sheet, select the bone, shift-select all its “location” channels in the Graph Editor, then while mousing over the graph side of the editor, hit `A -> S -> Y` and immediately type in your scale value. Verify the Action is correct before moving onto the next, and you should be good to go. ## Conclusion Whew! If anyone has corrections or suggestions, please leave them! It took a lot to figure all this out, and I couldn’t find many resources myself, so hopefully this helps someone out there. Good luck, you crazy rig scalers, you.
osiriswrecks 1 year ago • 100%
Just search for a community you're interested in from your home instance - for example, search for !3dmodeling@lemmy.graphics and it will show up. If it doesn't, wait for the "No Results" text to disappear and check for it in the communities list and click the subscribe button.
[JL Mussi](https://www.youtube.com/@jlmussi) - A super talented Maya artist with a lot of great tips and tricks videos. Definitely helpful, even if you don't use Maya. [OnMars3D](https://www.youtube.com/@OnMars3D) - Has a great collection of modeling videos. What other YouTubers should I follow?
This site is a treasure trove of info for 3D artists. If you ever need help with topology it's a great place to start - it even has an encyclopedia of terms for beginners!
A collection of communities around computer graphics topics - if you liked subreddits like, r/animation, r/3dmodeling, r/vfx, etc, then check these out! [/c/nukevfx](https://lemmy.graphics/c/nukevfx) - For Nuke compositors specifically !nukevfx@lemmy.graphics [/c/compositing](https://lemmy.graphics/c/compositing) - For compositors of all kinds (After Effects, Nuke, Fusion, Photoshop and more) !compositing@lemmy.graphics [/c/animation](https://lemmy.graphics/c/animation) - For animators and animation enthusiasts !animation@lemmy.graphics [/c/3dmodeling](https://lemmy.graphics/c/3dmodeling) - For software-agnostic 3D modeling tips and tricks. All programs welcome! !3dmodeling@lemmy.graphics [/c/webgl](https://lemmy.graphics/c/webgl) - For the many ways you can create 3D graphics on the web, including WebGL, ThreeJS, PolygonJS, and more. !webgl@lemmy.graphics